
Overview
Meshy Image to 3D converts any 2D image into a detailed 3D model in minutes. Upload a photo, concept art, sketch, or AI-generated image, and Meshy reconstructs it as a fully editable mesh ready for texturing, animation, or 3D printing.
Image to 3D is the best choice when you need precise control over the shape and visual style of your model. For rapid ideation without a reference image, try Text to 3D instead.
Quick Start Guide
Go to meshy.ai/workspace and select Model and you will see the interface shown below.
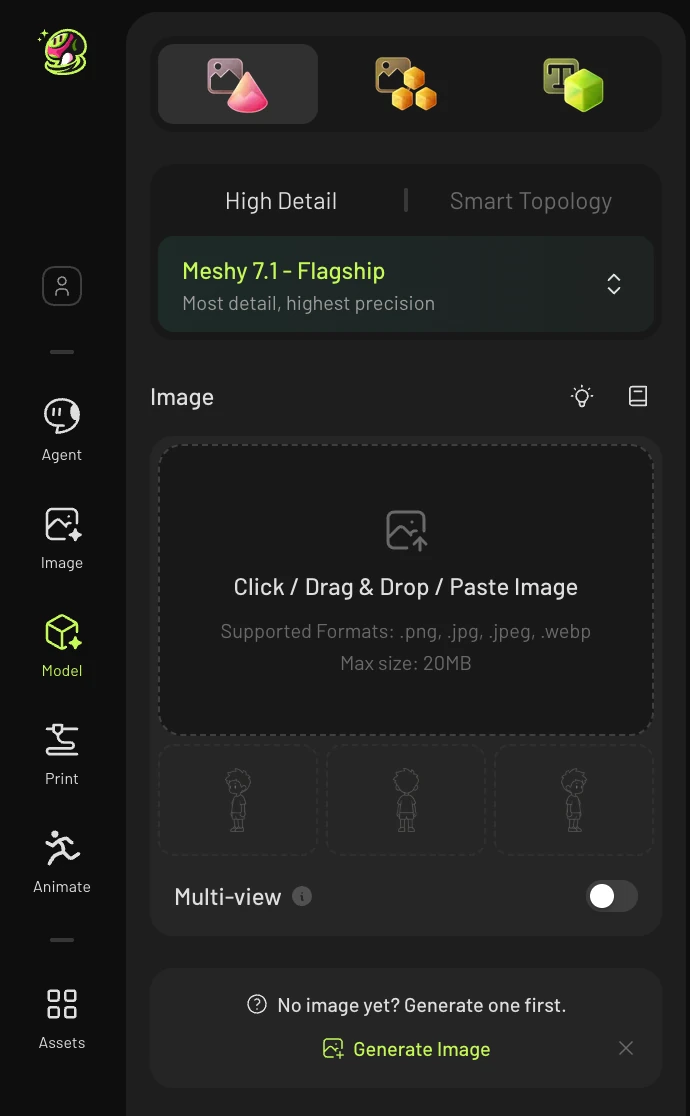
Then, click to upload, paste or drag and drop your image into the slot. Supported formats: .png, .jpg, .jpeg, .webp (max 20 MB).
💡 Tip: Use a clear, front-facing image with a plain background. You can also click Remove Background directly in the upload area.
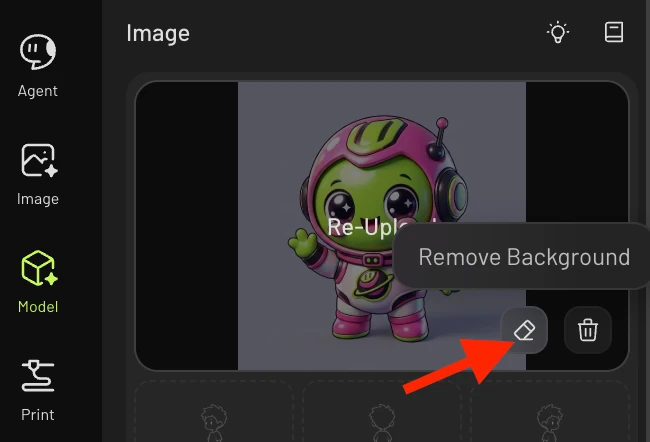
Configure your generation options — select Model type, Model version, and any additional settings (see the Generation Options section below).
Click Generate. Your model will appear in the assets panel on the right.
Note: the model generated at this stage will be an uncolored, white base mesh. To add color, click the Texture button below the model to generate a texture for it.
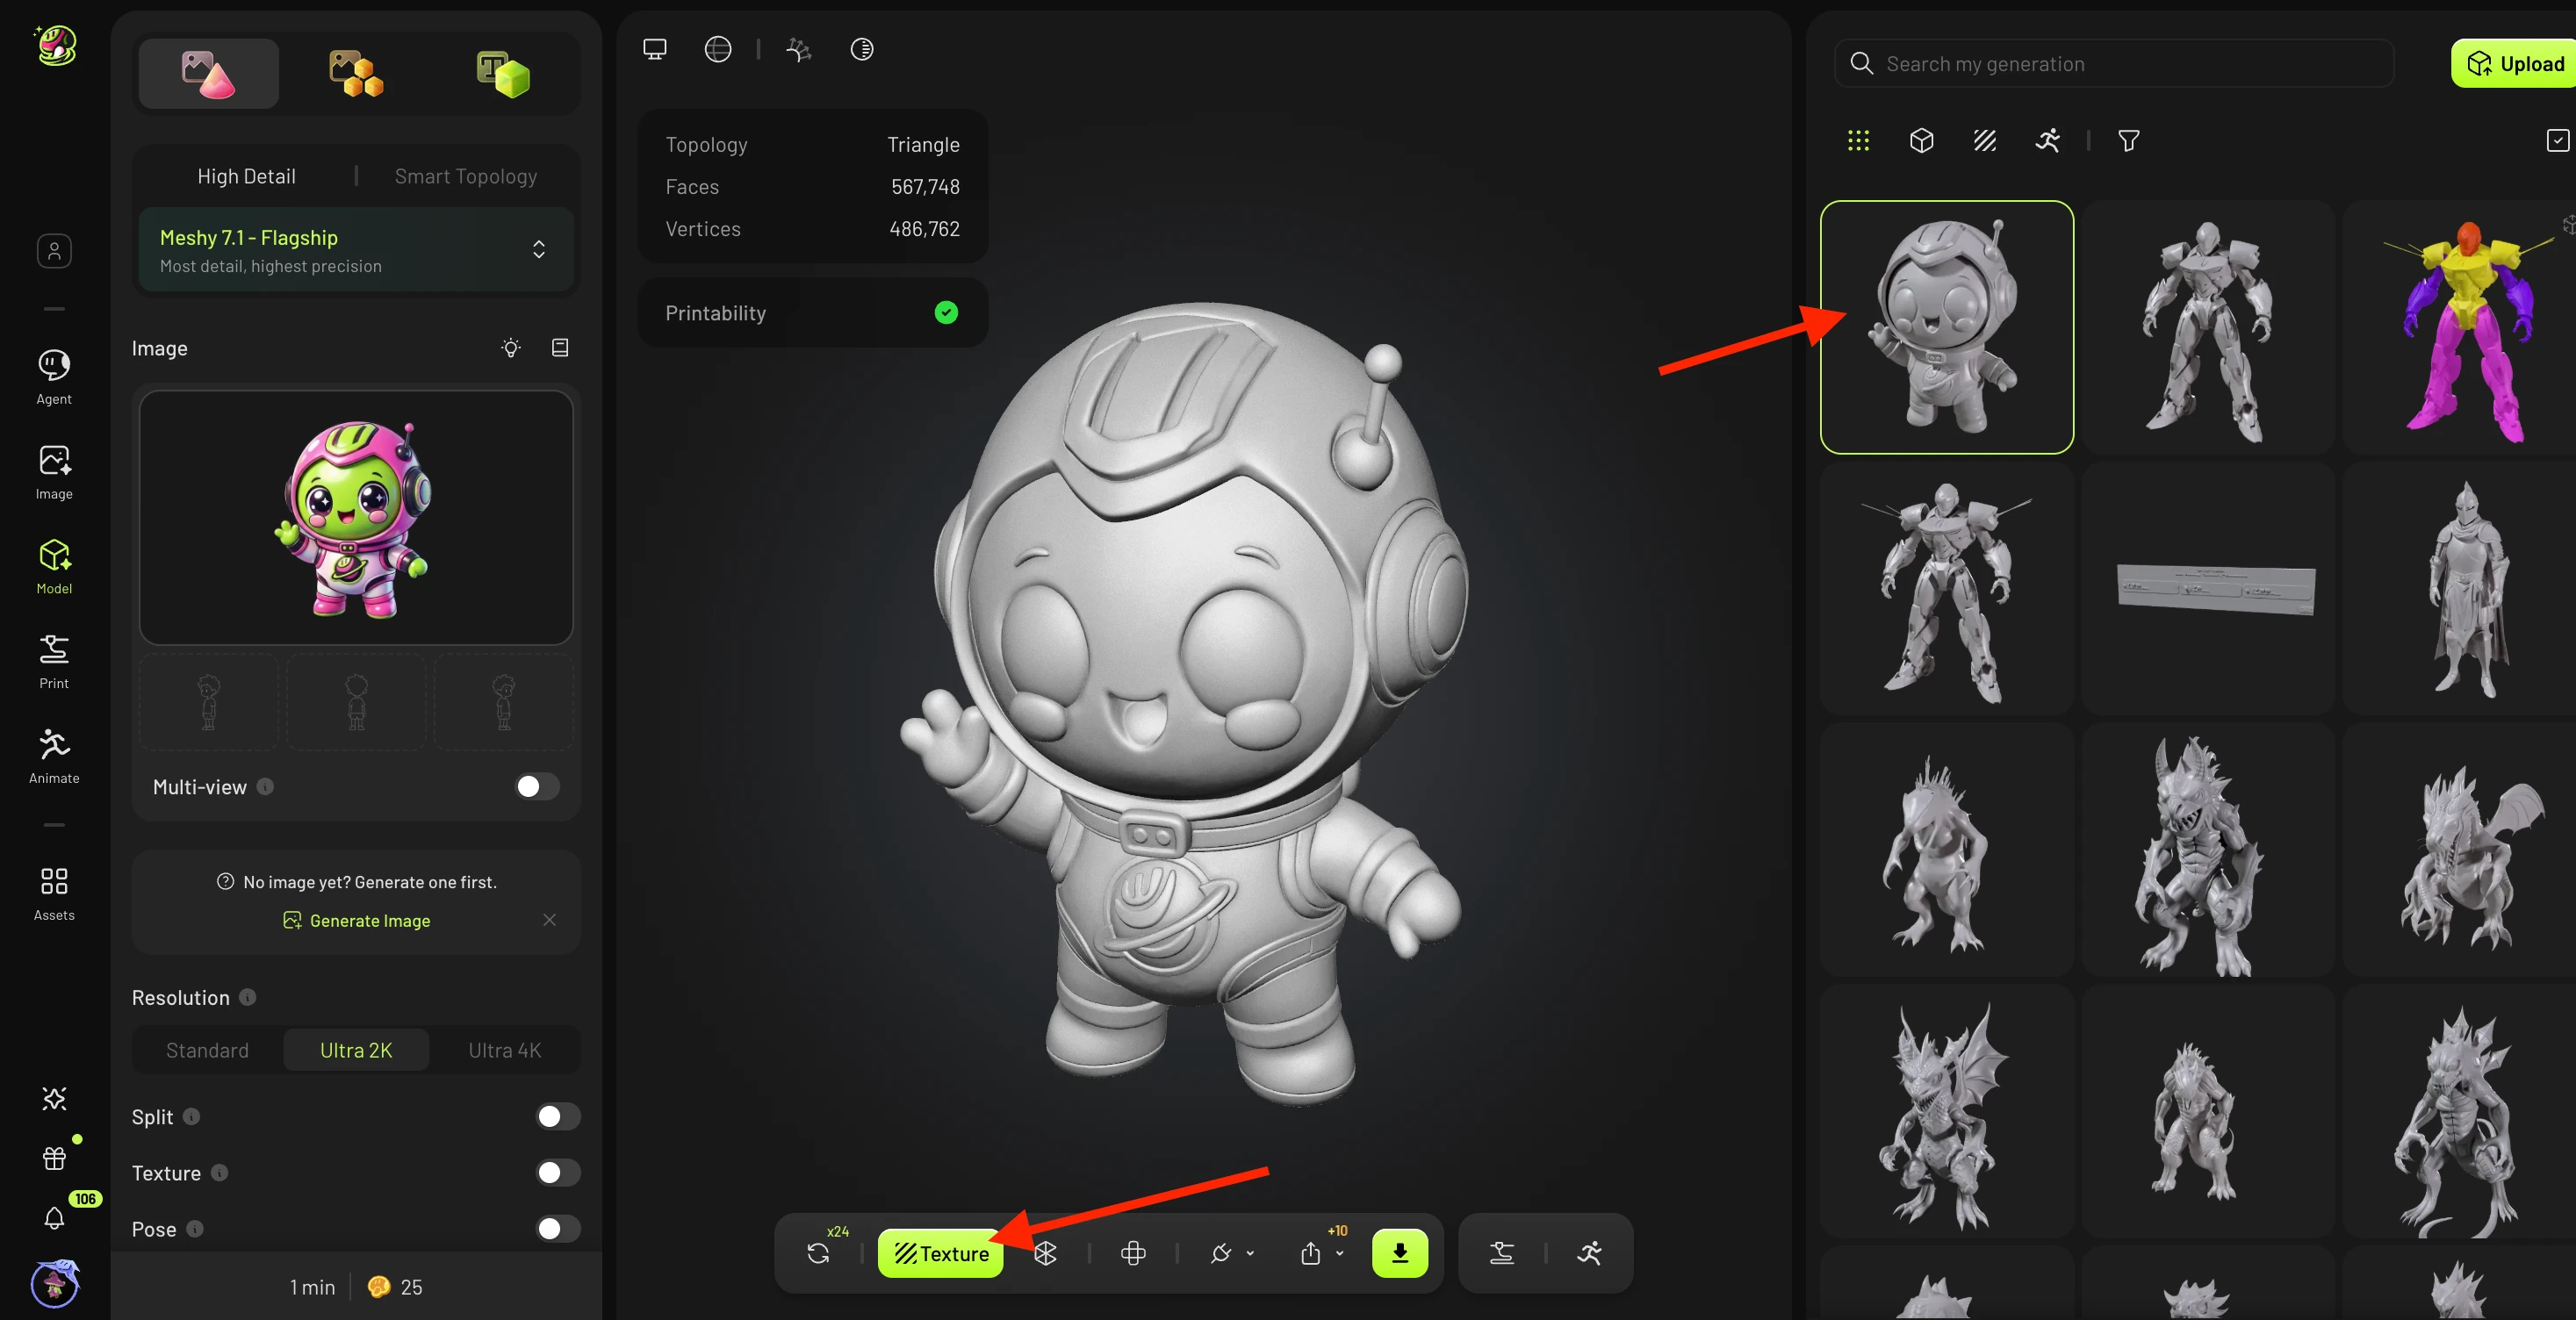
Rotate the mesh in the viewer to check its quality. If you spot minor issues (e.g. an extra finger or a small gap in the mesh), click the loop icon next to the Texture button to trigger a Free Retry, which regenerates the model using a different random seed.
Note: the time of free retries available depends on your subscription tier.

Once satisfied, either download the mesh directly (recommended: .STL or .3MF for 3D printing), or click Texture to generate an AI texture before exporting.
💡 Tip: You can also select Remesh to reduce poly count (best done before texturing), or Animate to auto-rig a posed character model.
Generation Options
Model Type
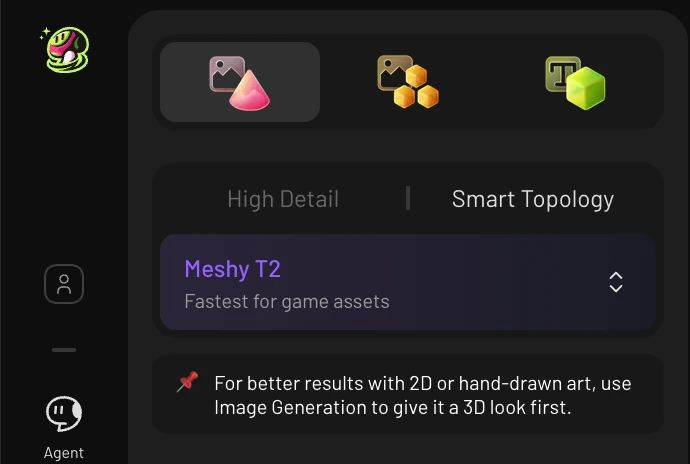
Controls the topology style of the generated mesh.
-
Standard — high-poly mesh with fine surface detail. Best for 3D printing, cinematic renders, and sculpting workflows.
-
Smart Topology — clean mesh with optimized edge flow and lower poly count. Made for game dev workflows, real-time and web-based 3D.
Model Version
Selects which version of the Meshy AI engine to use.
-
Meshy 7 — the latest model. Highest quality geometry and best surface reconstruction. Returns a single high-quality result directly.
-
Meshy 6 — returns a single high-quality result directly. Good geometry quality and surface reconstruction.
-
Meshy 6 lite —the faster, streamlined variant of the Meshy 6 architecture, designed for quick iteration and accessible generation.
For more details, see Meshy 7 vs Meshy 6 vs Meshy 6 Lite: Which AI Model Should You Use?
Auto Split
When enabled, Auto Split automatically separates the generated model into distinct mesh components — for example, a character's body, clothing, and accessories as separate objects. This makes it easier to texture, rig, or modify individual parts in external tools like Blender.
Multi-View
Multi-View lets you upload additional reference images taken from different angles (e.g. front, side, back) alongside your primary image. Providing multiple viewpoints gives the AI more geometric information, resulting in more accurate reconstruction — especially for complex or asymmetric subjects.
Note: Multi-View is currently only supported on Meshy 7
Tips for best Multi-View results:
-
Remove backgrounds from all views — use the built-in background remover on every uploaded image, not just the primary.
-
Use clearly distinct angles — each image should show a meaningfully different perspective (e.g. front, true side at 90°, back). If two views look too similar, the AI gains little extra information and may produce a symmetrical result.
-
Keep scale and lighting consistent — the subject should appear at roughly the same size in each view, with comparable lighting and framing.
-
One subject per frame — center a single object in each view image and avoid cluttered or distracting backgrounds.
For more details, see Meshy Multi-View Best Practices: Angles and Images
Pose
A character-specific option that outputs the model in a standardized rest pose, making it ready for rigging and animation.
-
A-Pose — arms angled slightly downward at roughly 45°.
-
T-Pose — arms extended straight out horizontally. The most widely supported rigging standard.
-
Custom — upload a reference image to copy a specific pose. Full guide here.
💡 Enable Pose only for humanoid or character models — it has no effect on objects, vehicles, or non-character subjects.
Image Enhancement
Applies AI preprocessing to your input image before generation. It sharpens details, improves contrast, and reduces noise — helping Meshy extract better geometry from imperfect source images. Enable this when your image is slightly blurry, low-resolution, or has inconsistent lighting.
License
Sets the usage rights for your generated model.
-
CC BY 4.0 — You're free to share and adapt the model, as long as you give appropriate credit to Meshy.
-
Private — Fully private; the model is not shared or licensed for public use.
See the Meshy Terms of Service for full licensing details. You can choose the model license when you generate the model, or you can click on the model afterwards to change the license.
FAQ
1. How do I choose between Standard and Smart Topology?
Choose based on how you plan to use the model:
-
Use Standard when visual fidelity is the priority — for 3D printing, high-resolution renders, or as a sculpting base. The higher poly count preserves fine surface detail.
-
Use Smart Topology when the model needs to run in real time or be rigged for animation. Smart Topology produces cleaner edge loops and a lower poly count that performs well in game engines and animation software.
If you're unsure, start with Smart Topology — it's easier to add detail later than to clean up a dense mesh.
2. Why doesn't the generated model match my reference image?
Several factors can cause the output to diverge from the input:
-
Hidden geometry — if parts of the object are not visible in the image (e.g. fingers hidden behind a hand, a back panel not shown), the AI must guess those areas and may generate inaccurate details. Use Multi-View to provide additional angles.
-
Busy or complex backgrounds — a cluttered background can confuse the model about what the main subject is. Use the built-in background remover before generating.
-
Low resolution or blur — unclear source images lead to inaccurate geometry. Enable Image Enhancement or use a higher-quality image.
-
Very fine details — thin features like hair strands, jewelry chains, or intricate surface patterns are difficult to reconstruct accurately in 3D from a single image.
-
Multiple objects in frame — if the image contains more than one subject, the model may merge them. Keep each generation focused on a single object.
3. My Multi-View result looks symmetrical — what am I doing wrong?
This usually happens when the uploaded views don't provide enough distinct geometric information. Common causes:
-
Too-similar angles — if your front and side images look nearly identical (e.g. both slightly angled front views), the AI can't distinguish depth differences. Use views at least 45°–90° apart.
-
Backgrounds not removed — a visible background in one or more views can confuse the model. Remove backgrounds from all uploaded images before generating.
-
Scale mismatch — if the subject appears at very different sizes across views, the AI has trouble aligning them. Crop consistently so the subject fills roughly the same proportion of each image.
💡 Tip: For the clearest asymmetric reconstruction, upload a front, a true 90° side, and a back view — with backgrounds removed from all three.
4. How do I get better results from a sketch or AI-generated image?
Sketches and AI art can work well with a bit of prep:
-
Remove the background first — AI-generated images often have busy or gradient backgrounds. Use the built-in Remove Background tool before generating.
-
Enable Image Enhancement — sketches often have low contrast or soft lines. Image Enhancement sharpens them so Meshy extracts cleaner geometry.
-
Keep it to a single subject — avoid full-scene illustrations or images with multiple characters. The AI performs best with one clear focal object.
-
Front-facing works best — a clear front-on view gives the AI the most to work with. If you have a side-view sketch too, add it via Multi-View.
-
Avoid extreme stylization — highly stylized art (flat 2D illustration, chibi proportions, line-art only) may produce unexpected shapes. A semi-realistic style with visible volume and shading gives the most accurate 3D output.