
Overview
Meshy Text to 3D allows you to generate highly detailed 3D objects simply by describing them in natural language. Whether it's a product idea, a creature concept, a game asset prop, or something totally imaginative, just type your prompt and let Meshy bring it to life in 3D — no modeling experience required!
-
Text to 3D shines when you need something fast and usable without worrying too much about controlling specific visual details. It's ideal for rapid experimentation, especially when you have a rough idea but haven't settled on a clear direction yet.
-
For higher-level control over visual details, or if you need models in a specific and consistent style, it's recommended to start with an image instead and use Meshy's Image to 3D mode.
You can also use our 3D Agent to help refine and develop your idea if you have a rough concept but aren't yet sure how to turn it into a model.
How to generate with Text to 3D
-
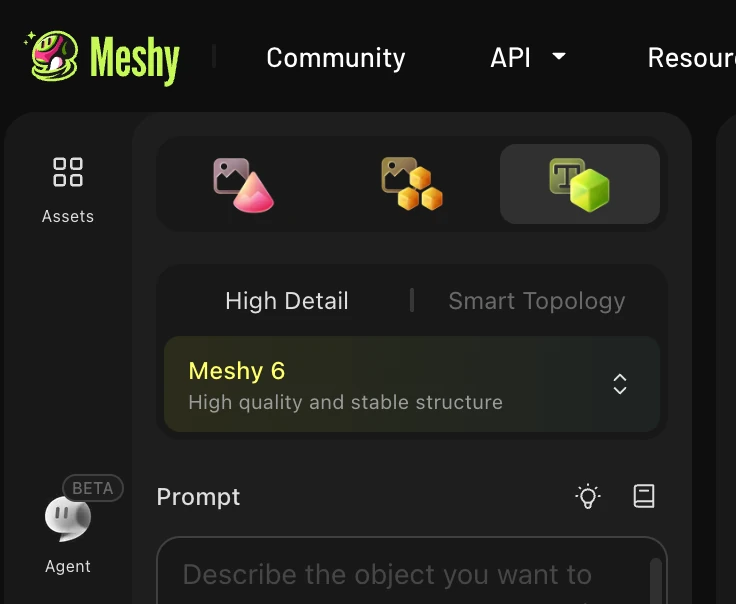
Go to workspace at https://www.meshy.ai/workspace, and select "Text to 3D" as it's shown below
-
Select which version of Meshy to use to generate with, using the drop-down menu.
-
Enter a detailed description of your model. Be specific—describe a single main object, its shapes, styles, and unique characteristics to guide our AI.
-
Wait for the generation, when complete you can rotate the mesh in the viewer to check its quality. If you spot minor issues (e.g. an extra finger or a small gap in the mesh), click the loop icon next to the Texture button to trigger a Free Retry, which regenerates the model using a different random seed.
Note: the time of free retries available depends on your subscription tier.
-
If using it for 3D printing or if you don't require a texture, you can download your model directly from the draft stage by clicking the download button below. We recommend .STL or .3MF for 3D prints.
It's also possible to print in color! Or add a base to your model. You can find these options below the model in the viewer by clicking "Print". See How to Convert a Photo to a 3D Printable Model
-
If you would like a texture, select "Texture" below the model. This will take you to the texture window. You can select which AI version you'd like to texture with and click "Texture". Texturing is an extra step with its own credit cost.
-
Your model is ready! Select the download button below it and choose which format you would like.
Text to 3D Tips
-
Focus on describing a single object, not a full scene.
-
Focus on describing about three to six key descriptive details. Too many might dilute or confuse the final output.
-
Be specific: type "Smooth gold metal" instead of "looks beautiful."
-
Use reference terms: "Like motocross gear," "in the style of an ancient artifact."
-
If you find Text to 3D output direction unpredictable, try the Text → AI Image → Image to 3D workflow for more control: generate an AI image first, review and refine it, then feed it into Image to 3D. You can generate images directly within Meshy!
Examples of strong prompts:
-
"A sleek, retro-futuristic android head with a glowing eye"
-
"Humanoid Male wearing a motorcycle helmet and biker outfit, with faded denim jeans"
-
"A geometric sculpture of cubes and spheres, smooth and polished"
Avoid:
-
Complex or contradictory descriptions
-
Prompts that might attempt to create non-physical details in your generation, e.g. smoke, glitter, electric magic energy
-
Very abstract concepts without tangible visual references
-
Prompts likely to create ultra-fine details like individual strands of hair
-
Excessive use of adjectives that might dilute the core concept
-
Technical jargon that the model might not understand correctly
FAQ
1.: Why aren't the generated models in an A/T-pose, even though I included those instructions in my prompt?
A: Adding A/T pose instructions directly into a text-to-3D prompt tends to produce inconsistent results, since the model has less control over pose at that stage. For more reliable results, we recommend going through text-to-image first, then feeding that image into image-to-3D — this gives the pose instruction more influence over the final output.
2. Why doesn't my model look exactly like my prompt?
AI generation is probabilistic, so results can vary. For more predictable output, try being more specific in your prompt, or use the Text → AI Image → Image to 3D workflow to review and refine a reference image before generating the 3D model.
3. What file formats can I download?
After texturing, you can download in GLB, FBX, OBJ, USDZ, and more. At the draft stage (without texturing), .STL and .3MF are recommended for 3D printing.
4. Can I rig or animate models generated with Text to 3D?
Yes! Models generated in T-Pose or A-Pose are well-suited for rigging in tools like Blender, Maya, or Unity. Use the A/T-Pose toggle in the generation settings or include pose terms in your prompt to get a rig-ready result.